Thursday 29 August 2013

August Tri Polish Challenge day 4 - random mix

Well look at me completing a full challenge like a boss! OK, so it was only four days worth, but I did it and I did it on time! Go me! Now we'll see if I can do the same if I work on the new 33 day challenge that the Crumpet's Nail Tarts have devised...

Today's manicure is a little bit random. I had intended to do this a bit differently, but it didn't work out. I started with a finger in each of the challenge colours, and my ring and index fingers in white ready for a gradient. I was going to tape off a stripe down the centre of each nail so only that would end up with the gradient on, but my white polish wasn't drying quick enough (patience? moi?) so I gradiented the whole nail and added glitter, then stamped on the other fingers. Weird, but good I hope you'll agree!


So, that's August done and dusted! As I said, Crumpet's Nail Tarts are attempting a new challenge soon, 3 days a week for the next 10 weeks or so. Come over and join us!

Hx


Pin It

Tuesday 27 August 2013

Tri-Polish Challenge August day 3 - Roll up, roll up...

Bonjour :)

Today is TPC day 3, and when I picked my three polishes for this month they immediately reminded me of a circus tent. Now as I'm now where near talented enough to create an actual circus on my nails, I tried a stamper decal to get the effect of a circus tent. If you're not familiar with the stamper decal technique it couldn't be easier. I paint a square of clear polish onto something shiny that it will peel away from when dry (in this case a silicone baking dish, but I've also used sticker backing paper and plastic sandwich bags successfully), and let it dry completely. Once that's done, stamp your image and colour it in using a little brush and either polish or acrylic. Let it dry again, peel off and stick to your nails with clear polish. A couple of coats of clear polish on top and you're done! I made a video tutorial here, if you'd like to look - it only shows individual images but it's more or less the same with a full nail design, you just clean up around the edges in the same way as you would normally. I used Bundle Monster BM301 with Konad Special white, and filled it in with Nails Inc Notting Hill Carnival and China Glaze Rougish Red. I went and got my eyebrows done today and they lady there made all the girls come and look at it...little embarrassing really!


Circus-y? Kinda! I'm a kinda kinda girl!

Hx


Pin It

Thursday 22 August 2013

August Tri-Polish Challenge Day 2 - Cheats Watermarble

Hello!

Check me out being on time for a challenge twice in a row! I've got something very refreshing today, with the green and yellow from the three challenge colours, and it reminds me of lemons and limes! Now, it looks like a watermarble, it feels like a watermarble, it even tastes like a watermarble... Too much? Ok, well it IS a watermarble, but I didn't marble directly onto my nails. I dropped my polishes (Nails Inc Notting Hill Carnival and Barry M Key Lime) into the water and made my pattern as usual. But instead of then dipping my fingers into the water and going through all the palava of taping them up, positioning and then cleaning up afterwards, I dipped a piece of plastic sandwich bag, which picked up the whole pattern. Then I let it dry completely, before peeling off the polish (as if you were making a stamping decal), finding the sections of the pattern that I liked, then trimming it and sticking them to my nails using clear polish. Topcoat and done! You dont have to be terribly accurate when trimming because you can use a clean up brush with remover to get them right, so cut them a little bigger than your nails. I did this twice for two accent nails on each hand, and could have gotten at least three nails from each piece, so you could probably get a full mani from three 'dips'. For this mani, I used a wee bit of Floam on the tips of my other three nails, which I think goes perfectly. Mess free watermarble that worked? Happy Helly.


What do you think? Would you like to see another video for this method? Maybe I'll dust off the camera again...

Check out the other Tri-Polish Challengers today, and hop over to Crumpet's Nail Tarts on Facebook if you want to join in!

Hx


Pin It

Tuesday 20 August 2013

August Tri-Polish Challenge numero uno!

Hi!

I decided to jump into the tri polish challenge again this month, and the colours are red, yellow and green. Now I don't know about you, but to me that screams Christmas, so I tried to pick un-Christmassy colours, ending up with Nails Inc Notting Hill Carnival (pastel yellow), China Glaze Roughish Red (orange-y red) and Barry M key Lime (spring green). They actually go together really well, and I'm looking forward to some epic manicures! Now if that isn't setting myself up for a fall I don't know what is...

Anyway, I started off with some dotting and I know I've seen something similar to this in several places but now I can't remember where. So whoever you are thank you! It was really easy and I'm glad I tried it. Even Mr NN said he liked it without me prompting him ;)


I was pretty pleased with how it came out and how the colours go together :) Check back on Thursday for my next go, and have a look at all the lovely manis the girls over at Crumpet's Nail Tarts have created!

Hx

Pin It

Tuesday 13 August 2013

It all started with a Big Bang!

Hi loves!

I'm a big Big Bang Theory fan, so when Dollish Polish release a BBT themed collection I oohed and ahed over them, my favourite being Penny...Penny...Penny... I'm just a sucker for a milky base! I was lucky enough to grab one in a blog sale and I was not disappointed. Penny...Penny...Penny... is a pale, milky warm nude base with copper shimmer and copper square and hex glitters. The formula was awesome, no fishing for glitters, no streaks or dragging - just two coats of amazeballs. I paired it here with Sally Hansen Shiny Penny and loved it so hard I didn't want to take it off.


Now I'm having a bad day today, so I'm going to sit in the corner and sing "Soft Kitty" to myself, and I'll leave you with this cuteness from my then 2 year old.


Hx
Pin It

Sunday 11 August 2013

Adventures in Stamping - Multicoloured Mess

Hello! Happy Sunday :)

This week the theme over at Adventures in Stamping was to stamp with two or more colours within the same image. I've done this before fairly successfully, but I wasn't all that convinced with today's result. Maybe because the image  used was wavy and a little abstract it didn't really work? I don't know. ANyway the base was Nails Inc Hampton Court Palace Gardens, and I stamped with Sally Hansen InstaDry Jade Jump, Speedy Sunburst and Konad White. The plate was Pueen 42.


And I unintentionally matched my dress. Kind of...


Anyway, that was my fail this week! Sorry I've not blogged all week, but I've had visitors and time got away from me. I'm thinking of having a little blog revamp in the not to distant future, so keep an eye out for that! I want to get back into blogging proper, so a fresh start may be needed...

Hx
Pin It

Sunday 4 August 2013

Adventures in Stamping - XOXO

This weeks Adventures in Stamping prompt was to use a plate ending in 8. Now, sit back, I'm going to tell you a little story. While my plate collection is not vast, the number I own is definitely in the hundreds - I have the first 3 Bundle Monster sets, a cheeky, a GALS and a Pueen set, 20 or so HB plates, a few sets with 4 or 5 plates in (Salon Express, Nailz Craze, Fun) and quite a few miscellaneous plates - konads and fauxnads, a couple SdP's, an Cheeky XL. You get the picture. Friday night, I sat down with my box of plates and spent about 20 minutes pulling out all of the plates ending with a 9. Hang on, I hear you say, didn't she just say the theme this week was plates ending in 8? Well, yes. Yes I did dear reader. Doh. So, I went a put all the "9" plates back in the right places (about 20 of them), and then spent about another 20 minutes pulling out all the 8s - again about 20. I chose the one I wanted to use and then carefully put back all the others. I started on my base with the box of neatly organised plates sat next to me on the couch, until something spooked the dog and he jumped up sending the box flying. Grr. So then, I had to pick the scattered plates up from the floor with wet nails, which of course meant ruining the base, and even managing to peel off a split I'd been babying. Safe to say this mani was not meant to be...

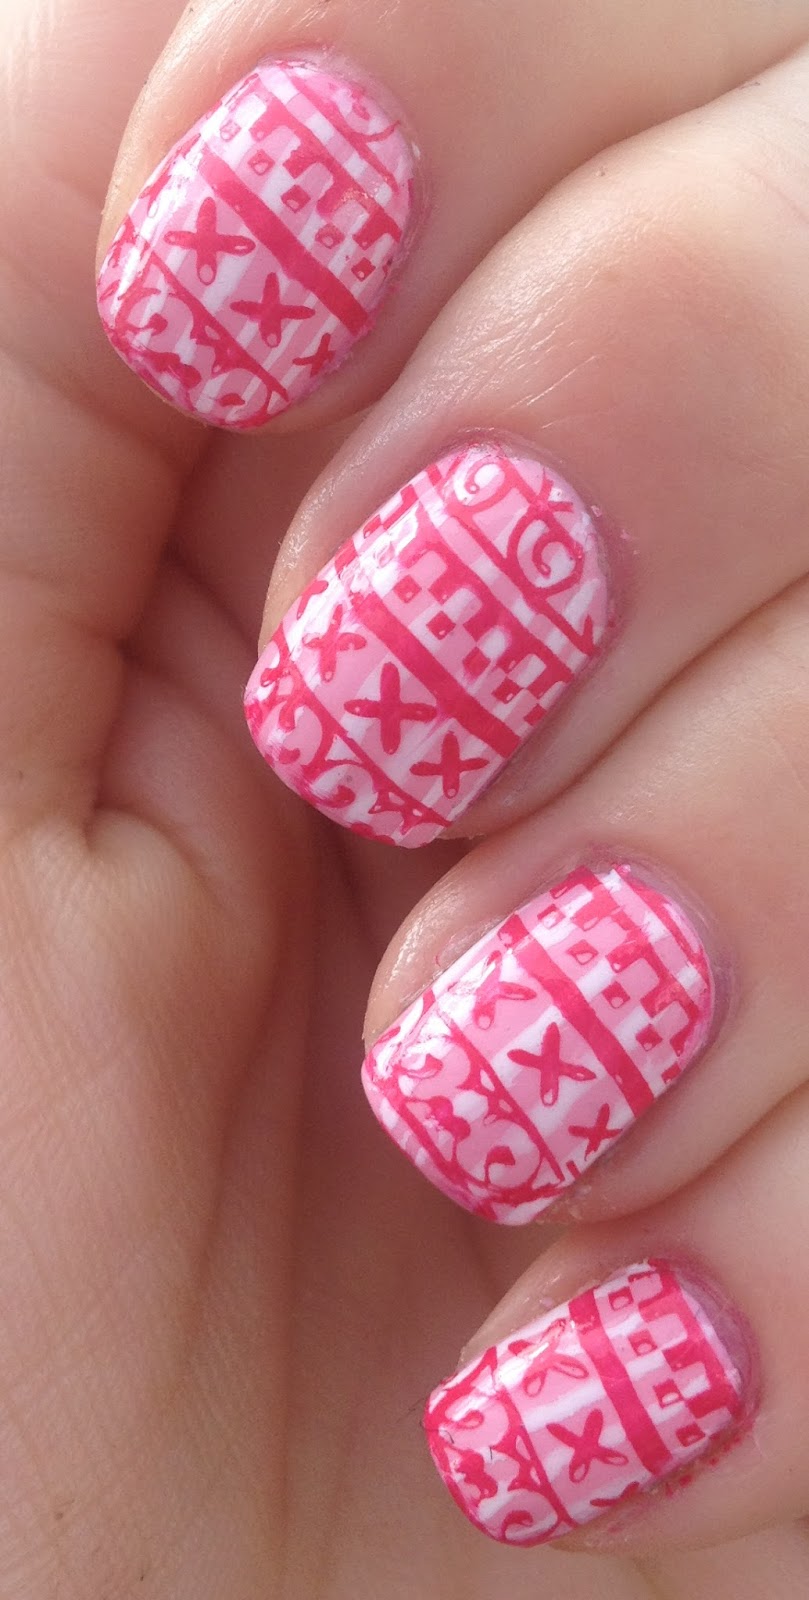
Anyway, I did get it done eventually, and I rather like it in the end. The ill fated base was OPI Pink Friday, which I added stripes to with Barry M's white nail art pen. Then I stamped using Sallen Hansen Insta Dry Speedy Sunburst and Pueen 38.


After all that hassle, I really don't feel like taking it off tonight... I'll have to replace it with something really awesome ;)

Hx
Pin It