Hi loves!
I had an utter brain block when it came to this challenge. I've been blogging and doing nails for a few years now, and I could not think of a technique that was new! I've tried drag marbles, splatters, spun sugar, tape, cling film, watercolour, one stroke, plaid, water spotted, stamper decals, fan brush... Stumped. In the end I went with something that I have played with before, but not posted on the blog, and added a new element too! My lovely friend Tracy sent me some foils to try a while ago, and they are a lot of fun! I've not perfected it quite yet, but with the foil I chose today it didn't matter too much. And then I stamped on top of them too, which I'd never done before. I loved the result!
I started with a base of China Glaze Aquadelic, which was the closest colour I had to the base colour of the foils. That way, if there are any gaps once you've transfered your pattern, it's not so noticeable. Once that was dry I added a layer of foil adhesive and let it go tacky - about 10 mminutes. Then it's simply a case of applying the foil, rubbing it over with a cotton bud and hey presto, the image transfered! I did miss a couple of patches, but as you can see it wasn't too noticeable, and as this wasn't a repeating pattern I put on a bit more glue and went over it again.
I then topcoated - and this is where it could have gone horribly wrong! See, metallic foils don't tend to like topcoat, especially fast drying ones like my favourite Poshe. The topcoat wrinkled the foil a little bit, but actually it didn't matter because of the pattern again. But a top tip I learned in hindsight is to apply a layer of PVA glue (like the glitter peel off method) and let that dry before topcoating. It just adds a layer of protection between the foil and the chemicals in the topcoat. Anyway, once that was dry I stamped over with an image from Bundle Monster 406 and Konad Black Pearl.
You could get the same effect using the cling film/saran/plastic wrap method, but I think the gold is bolder using this foil and I loved it! I really must play more often :) That's if I ever manage to stop browsing websites looking for more...
Hx
Showing posts with label china glaze aquadelic. Show all posts
Showing posts with label china glaze aquadelic. Show all posts
Monday, 18 November 2013
Thursday, 1 March 2012
Purple Crumpet Fairy Challenge - Day 11, Pastel Patchwork
Hi loves!
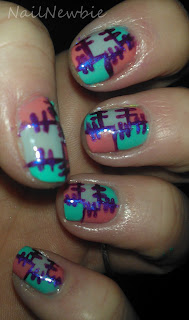
For today's challenge I followed a tutorial by the immensely talented Kayla Shevonne. I thought it looked quite simple (certainly simpler than how I was planning to do it...) and it wasn't too bad - it just took me an age! My hand looked like a claw when I was finished...hence the strategic accent nail on the right hand. I think it works great as an accent nail though! Ahem, that's my excuse...
I started with a coat of Beauty Uk Soft Grey and then drew the patches with a purple striper polish (I don't have a black, and thought it would be easier with a striper rather than a brush and separate polish). Then I filled in the rest of the patches with Collection 2000 Fruit Salad and China Glaze Aquadelic, just using the bottle brushes. Then I went back over the lines with the striper and added the stiches. Result, cute nails and hand cramp!
It's not perfect, but is it ever? I think this is the most detailed freehand nail art I've ever done and I love it, and the possibilities are endless! Pinks, brights, monochrome, metallic...yep, love.
I did try and get Mr NN to do the other hand for me, but he couldn't copy the design right, gave up and drew a willy instead. Say no more.
Hx
For today's challenge I followed a tutorial by the immensely talented Kayla Shevonne. I thought it looked quite simple (certainly simpler than how I was planning to do it...) and it wasn't too bad - it just took me an age! My hand looked like a claw when I was finished...hence the strategic accent nail on the right hand. I think it works great as an accent nail though! Ahem, that's my excuse...
I started with a coat of Beauty Uk Soft Grey and then drew the patches with a purple striper polish (I don't have a black, and thought it would be easier with a striper rather than a brush and separate polish). Then I filled in the rest of the patches with Collection 2000 Fruit Salad and China Glaze Aquadelic, just using the bottle brushes. Then I went back over the lines with the striper and added the stiches. Result, cute nails and hand cramp!
I did try and get Mr NN to do the other hand for me, but he couldn't copy the design right, gave up and drew a willy instead. Say no more.
Hx
Labels:
aqua,
Beauty Uk,
China Glaze,
china glaze aquadelic,
Collection 2000,
coral,
grey,
nail art,
purple,
purple crumpet fairy challenge
Subscribe to:
Posts (Atom)


